How to install wordpress manually in just 5 minutes ?


The first thing you need to do to install WordPress is to download the latest installation package. Make sure that you download WordPress only from the official download page.

Once the download is complete, extract the archive and upload it to your web hosting account. You can do that via FTP using a client application like Filezilla or via cPanel -> File Manager -> Upload file(s). If you want this WordPress installation to be main for your website, the files should reside in the public_html folder of your account. However, you can always make a subfolder (i.e. public_html/blog) if you want to run only part of your website on WordPress.

Next, navigate to your website to start with the installation process. If you have uploaded WordPress in your public_html directory you'll need to go to http://yourdomain.com in your preferred browser. The first thing you will notice is a message, telling you that you don't have a wp-config.php file and you should create one. Just click on the Create a ConfigurationFile button to proceed.


On this page you will see a message, asking you to prepare the necessary information for the installation. Basically, you need to make a new MySQL database, username for it and grant that username the appropriate permissions for this database. For detailed information on how to do that, please refer to our MySQL tutorial. Once you have your database info, hit the Let’s go! button.


Enter the details for your newly created MySQL database and press the Sumbit button


On the next screen you will have to enter the information about your administrative username and the title of your new site. In addition, you can specify whether you'd want search engines to index your site or not. Once you fill in that information, press the Install WordPress button. Bear in mind, however, that you should specify a real email address. It can be later used in case you forget your password.


That's it! Your new WordPress application is installed. You can use the Login In button to access your administrative backend and start posting in your new site.

How to install Wordpress in xampp ?


  1. Download and save the latest version of Wordpress from the following link:

    http://wordpress.org/latest.zip

    Download and save the latest version of Wordpress from the following link: http://wordpress.
     Download and save the latest version of Wordpress from the following link:

    http://wordpress.


  2. Extract the contents of the ZIP file called "wordpress
    .zip", which was downloaded in step 1, to the htdocs folder within the XAMPP directory.

    Extract the contents of the ZIP file called "wordpress.
     Extract the contents of the ZIP file called "wordpress.


    If ZIP file extracted properly there should be a new directory called "wordpress" within the \xampp\htdocs directory.


  3. Before the process can move forward, please ensure that the web server environment is running properly
    .

  4. Go to the XAMPP main page by opening a web browser and entering the following URL
    :

    http://localhost/xampp/ .

    Go to the XAMPP main page by opening a web browser and entering the following URL:http://localhost/xampp/.
     Go to the XAMPP main page by opening a web browser and entering the following URL:

    http://localhost/xampp/.

  5. Select the link called "phpMyAdmin" on the lower left side of the menu or by entering the following URL
    :

    http://localhost/xampp/phpmyadmin .

    Select the link called "phpMyAdmin" on the lower left side of the menu or by entering the following URL:http://localhost/xampp/phpmyadmin.
     Select the link called "phpMyAdmin" on the lower left side of the menu or by entering the following URL:

    http://localhost/xampp/phpmyadmin.

  6. At the phpMyAdmin main page, there will be an area in the middle of the screen called "MySQL localhost"
    . From this section a new database will be created for use by the Wordpress installation.

    Example before settings


    In the field labeled "Create new database" enter the name "wordpress". From the dropdown labeled "Collation" select "utf8_unicode_ci". Then press the button labeled "Create".

    Example after settings


    If the database entry was created successfully the message "Database wordpress has been created" should be displayed.


  7. Using the Windows Explore navigate to the xampp\htdocs\wordpress directory
    . Open the file called "wp-config-sample.php" within the wordpress directory.

    Using the Windows Explore navigate to the xampp\htdocs\wordpress directory.
     Using the Windows Explore navigate to the xampp\htdocs\wordpress directory.


  8. Once the file has been opened edit the following lines
    :

    /** The name of the database for WordPress */
    define('DB_NAME', 'putyourdbnamehere'); ==> change 'putyourdbnameheree' to 'wordpress'

    /** MySQL database username */
    define('DB_USER', 'usernamehere'); ==> change 'usernamehere' to 'root'

    /** MySQL database password */
    define('DB_PASSWORD', 'yourpasswordhere'); ==> change 'yourpasswordhere' to ' ' (leave it blank)

    Once the file has been opened edit the following lines:/** The name of the database for WordPress */define('DB_NAME', 'putyourdbnamehere');  ==> change 'putyourdbnameheree' to 'wordpress'/** MySQL database username */define('DB_USER', 'usernamehere');  ==> change 'usernamehere' to 'root'/** MySQL database password */define('DB_PASSWORD', 'yourpasswordhere');  ==> change 'yourpasswordhere' to ' ' (leave it blank).
     Once the file has been opened edit the following lines:

    /** The name of the database for WordPress */
    define('DB_NAME', 'putyourdbnamehere'); ==> change 'putyourdbnameheree' to 'wordpress'

    /** MySQL database username */
    define('DB_USER', 'usernamehere'); ==> change 'usernamehere' to 'root'

    /** MySQL database password */
    define('DB_PASSWORD', 'yourpasswordhere'); ==> change 'yourpasswordhere' to ' ' (leave it blank)

    .

  9. When the file has been edited as described in the previous step, save a copy of the file as "wp-config
    .php" in the wordpress directory and close the file.

    When the file has been edited as described in the previous step, save a copy of the file as "wp-config.
     When the file has been edited as described in the previous step, save a copy of the file as "wp-config.

  10. Go to the Wordpress Installation page by opening a web browser and entering the following URL
    :

    http://localhost/wordpress/wp-admin/install.php .

    Go to the Wordpress Installation page by opening a web browser and entering the following URL:http://localhost/wordpress/wp-admin/install.
     Go to the Wordpress Installation page by opening a web browser and entering the following URL:

    http://localhost/wordpress/wp-admin/install.

  11. Enter a title for the blog in the field labeled "Blog Title"
    . Enter an email address in the field labeled "Your E-mail". Then press the button labeled "Install Wordpress".

    Enter a title for the blog in the field labeled "Blog Title".
     Enter a title for the blog in the field labeled "Blog Title".

  12. If the information in the previous step was entered correctly there should be a new screen titled "Success
    !". This screen presents a username called "admin" and a temporary password. It is a randomly generated password so it is important to make note of it until a new password has been selected. Press the button labeled "Log In".

    If the information in the previous step was entered correctly there should be a new screen titled "Success!".
     If the information in the previous step was entered correctly there should be a new screen titled "Success!".

  13. At the Log In screen type the word "Admin" in the field labeled "Username" and type the temporary password, which was created in the previous step, in the field labeled "Password"
    . Press the button labeled "Log In".

    At the Log In screen type the word "Admin" in the field labeled "Username" and type the temporary password, which was created in the previous step, in the field labeled "Password".
     At the Log In screen type the word "Admin" in the field labeled "Username" and type the temporary password, which was created in the previous step, in the field labeled "Password".

  14. If the log in was successful then the Wordpress Dashboard appears
    . There is a notice which states that an auto-generated password is being used and to change it to something easier to remember. The link labeled "Yes. Take me to my profile page" allows the temporary password to be changed. Once the password has been changed editing of the content and themes can begin.

    If the log in was successful then the Wordpress Dashboard appears.
     If the log in was successful then the Wordpress Dashboard appears.

Where to paste adsense code in html ?


Every HTML document is made up of bracketed tags which tell the web browser how to display the HTML elements. All HTML elements start with an opening tag (< >) and end with a closing tag (</ >). HTML documents have the following basic structure:

<HTML>

<HEAD>
</HEAD>
<BODY>


</BODY>
</HTML>

The opening <HTML> tag alerts a browser that this is the start of your HTML document.
The opening <HEAD> tag contains your header information and is not visible when you view the page in your browser. Any text displayed between the BODY tags (<BODY> and </BODY>) will be displayed in your browser.
The closing </HTML> tag alerts your browser that this is the end of your HTML document.
For ads to appear properly, you need to place your ad code between the opening <BODY> and closing </BODY> tags of your source code.
If you're having trouble finding the <BODY> tags, try pressing the 'CTRL' and 'F' keys on a PC, or 'COMMAND' and 'F' keys on a Mac to open a Find text box. Then type '<BODY' (without the quotes) to find the opening tag or '</BODY' (without the quotes) to find the closing tag, and click Find next.
Finding the <BODY > tags is important, because you need to paste the AdSense ad code in between the <BODY> and the </BODY> tags of the document.

How to change blogger template ?

Some might use blogger old interface. But the old blogger interface will not be available in future. That means old interface retires
So I write about ‘How to Change Blogger Template in New Blogger Interface’. Below are thestep by step procedures to change the blogger template. 
1. First download a new blogger template. Lots of templates are available in internet for free. Search for free blogger templatesDownload a template which you want. The blogger template you downloaded will be an xml file or text file.
2. Login to blogger.You will get your list of blogs
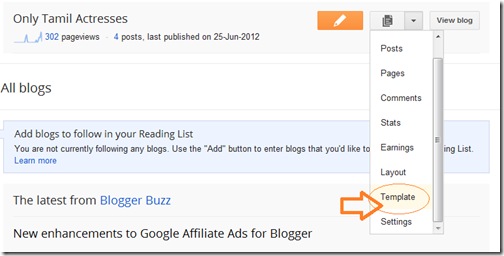
3. Then go to ‘template’ section as given in below image.
Blogger-Template-Changing

Youtube getting paid from march


Youtube is now going to be a paid website
 can you believe it  ?

With 72 minutes of video uploaded every minute on youtube ,world's most largest video uploading and sharing website is going to charge you for watching videos.

currently youtube earns from the ads which you can see on the videos uploaded by different uploaders . It is said that youtube will make this change from march of this year.

it is said that its subscription charges will vary from 50 rupees to 150 rupees .

previous tv episodes, songs , previous award shows ,serial's clips and some other categorized videos .

Although some people belevies that this is a rumour but some newspapers have published that
youtube may start it's new monetizing trick but will not charge for pay per view

But maybe now you can watch some tv episodes on youtube by paying them which were earlier unavailable .

How to add your blog to google index ?


Add your Blog to Google

The very first step ,you have to do when you created a blog is Add your site to Google index , its not a must to follow thing , Google will automatically crawl your blog but it takes little time , who knows it may a day or week or months to get your blog visited by google bot . So its highly recommended to Submit your blog to Google webmaster .
By this way, You are requesting Google to visit your blog , and then the magic will happen , all your future blog posts will then be crawled by Google .
I’ve given two steps which you’ve to follow to get your blog indexed within a day / 24 hours , i’ve personally tested and i follow this method for all my blogs whenever i created new blogs / site . i do this as a very first step .

How to add your blog to Google ?

Step 1 is very simple thing
1.Goto http://google.com/addurl
2.Enter your Blog URL in the URL box, enter the captcha.
3.Click Add Url
4. Now,you’ve successfully added your blog to the google.

Add your blog to Google Webmaster Tools for Fast Index

Step 2 :
1. Sign in to Google Webmaster Tools
2. Click Add Site on the right side , Enter the URL of a site you would like to manage
3. Now, Look for Submit Optimization > Sitemaps on the left sidebar ,
4. Click Add / Test Submit and enter your sitemap url
For Blogger : atom.xml?redirect=false&start-index=1&max-results=500
For WordPress : http://your site.com/sitemap.xml